I’m sure that as the owner of a WordPress site, you often had a desire to make certain content of the website more visible, separated from other content. It would be even better if that content could move and display on the website regardless of where the visitor is located, whether at the top of the page or the bottom. This can be done very easily. Elements that are always displayed on the page, regardless of scrolling, are called sticky elements. Continue reading for more details.
As we all know, navigation is a vital and indispensable segment of every website. The quality of the website, earnings, and view of many pages depends on the quality navigation and links in it. Every web administrator will put the most critical links in the navigation for visitors to achieve what they want, whether it is a visit to a link, a click on a specific ad, a redirect to a particular part of the website, and so on. To increase the chances of a portal visitor clicking on a link in the navigation, administrators have started creating menus that remain visible (usually at the top of the page) even after the visitor scrolls through the page from top to bottom. Such a menu is called a sticky menu.
What is a sticky menu?
As previously mentioned, the sticky menu is a menu or navigation bar that remains visible to the website visitor at any time, regardless of scrolling the page up or down.
There are many examples of the benefits of sticky menu navigation, but we will mention this one:
Imagine you have a web shop and you have a “Discount 50%” link in your menu. If you don’t have a sticky menu, once a visitor reaches the bottom of the page, the chances are big that they’ll just close and leave.
However, if you have a sticky menu, regardless of where the visitor is on the page, the menu will always be visible, and the visitor will see the link “Discount 50%.” There are great chances that the visitor will visit that link and thus find something that suits him and will make a transaction or buy an item.
The most important links, discounts, special buttons are usually added to the sticky menu, but there can also be advertisements.
Realizing all the benefits of the sticky menu, most WordPress theme developers include the sticky menu as an integral part of the theme. The theme user is left with the option to turn the sticky menu on or off from the admin panel.
If you are using a theme that does not have a sticky menu, and you really like that theme, it does a good job, you have already done some custom work, and you do not want to change it; you can add a sticky menu yourself. Several ways are depending on how professional you are and how skilled you are in programming and CSS.
The more complex way is to make your sticky menu plugin or program a classic menu to act like a sticky. To accomplish this, you need to be skilled in programming, well versed in CSS to be able to dictate the behaviour of your menu.
A far easier way is to make a sticky menu with the help of a ready-made plugin. There are a lot of plugins for the sticky menu today. Still, we recommend that you pay attention to the compatibility with your version of WordPress, the comments of other users, and the known bugs before installing them.
Our advice is to make a website backup before any action and installation on the WordPress platform. It can happen that after the installation of a plugin, the website is no longer functional, and with the help of backup, you will easily restore your portal to the state it was in before the installation.
There is one plugin that we would distinguish from the others in terms of quality and ease of use, and that is WP Sticky plugin. It is a plugin that allows you to create a sticky menu, sticky header, widget, video, or any other element on your site. You are wondering why we would use this plugin when most themes come with a sticky menu option? The reason is that the sticky menu is not the only option of this plugin. Using it, you can make sticky any element on a website, whether it is a header, menu, logo, some widget, some call-to-action button. With WP Sticky, everything can be sticky.
In the following steps, we will show you how to use this powerful tool and how easy it is to use.
Once you have determined which element on your website you want to be sticky, you must give it a name in the plugin options. So, for example, if it’s a menu, name it “My menu” or “My sticky menu” or “My top menu” or whatever you want.
After that you have to give instructions to the plugin which part of the website to “watch” to turn it into a sticky element. This means that the part of the website that you want to be sticky needs its own unique ID.
If you’re afraid of making a mistake or don’t want to write a unique ID for an element yourself, try a plugin option called Visual Picker. This is a very good option that will allow you to move the cursor over the elements with a simple click to turn any element into a sticky one. Once you have clicked on the element you want to be sticky, Visual Picker will determine the unique ID itself and write it down for you.
Don’t forget to save the changes by clicking on the “Save” option in the upper left corner.
Once you have selected the item that will be sticky, you can easily determine on which part of the web page to display. Simply Select a display position from the drop-down menu and click “Save.”
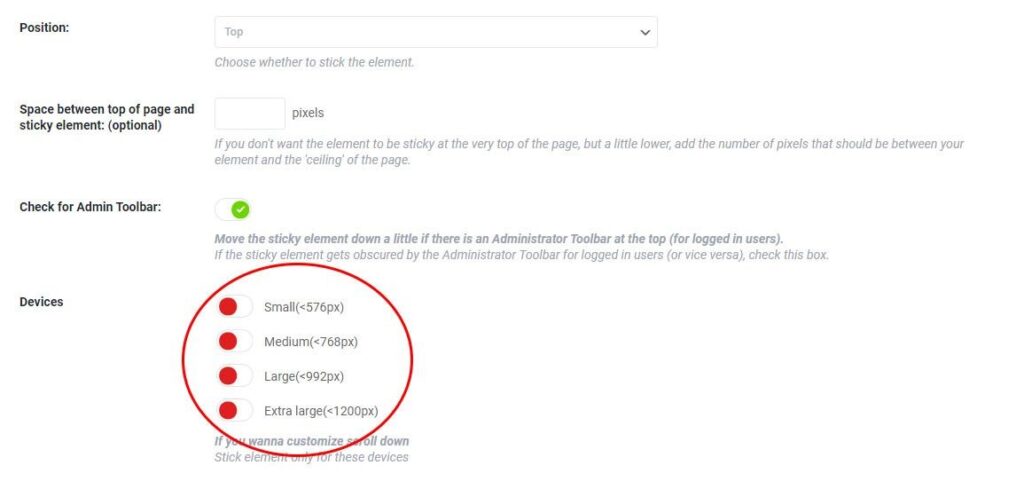
Another advanced plugin option is that you can hide the sticky menu depending on the device from which the visitor accesses the website. If a visitor accesses your website from a mobile phone, which has a smaller screen and less space for displaying content than a laptop, you can specify in the plugin that the sticky menu does not appear for mobile devices. WP Sticky allows you to show or hide sticky content depending on the screen size.
There are plenty more options to customize your sticky element and allow it to fit perfectly into your design and website
Some of these options are:
- Scroll range: you can set the sticky menu to appear only after the visitor scrolls a certain percentage of the website. For example, set the scroll range to 40% And the sticky menu will only appear after the visitor crosses 40% of the website.
- Bg color: you can adjust the background color of any sticky element to fit the design as well as possible.
- Custom CSS: an additional field if you want to expand the possibilities and write your own CSS. Simply enter the CSS code in the field provided, save the changes and enjoy the options that this great plugin offers.
WP Sticky is a great plugin with which you can make sticky any part of your website. The PRO version of the plugin is not free, and there are 3 packages available, the cheapest is $ 39 for 1 Site License, Team package is $ 49 And it is for 3 sites license, and the most expensive package with full options is Agency, and it costs $ 99 and gives licenses for 100 websites.
Given the relatively low prices compared to the competition, and the excellent support, this plugin is definitely worth a try.


![[pii_email_c0872b2275c5451a2577]](https://www.allnetarticles.net/wp-content/uploads/2021/09/How-To-Fix-Error-pii_email_c0872b2275c5451a2577-in-Email.png)
![[pii_email_c75373ce5b34bf577425]](https://www.allnetarticles.net/wp-content/uploads/2021/08/Fix-pii_email_c75373ce5b34bf577425-in-3-Working-Ways.jpg)
